Bash Command Line Interface
Software engineers often work with command line oriented tools to aid
them in the development of software systems. One of the most
common and powerful types of command line interfaces (known as
"shells") are POSIX shells such as the popular "bash" shell, which
we'll introduce in the laboratory exercises that follow.
Software
The exercises in this laboratory are intended to be run using bash.
Bash is the default shell for Mac OS X and most systems built
on top of the Linux kernel. It is also available for
Microsoft Windows system as part of the Cygwin project. If you have a
Windows OS and would like to perform the following exercises on your
local Windows machine (instead of the remote ECELRC hosted linux machines),
you must install Cygwin,
a port of Linux tools for the Windows environment. If you do use Cygwin,
be sure to install the following packages in addition to the default/base install:
util-linux, vim.
The Basics
Directories
File and directory paths are specified using the forward slash "/" to
separate
directory and file
names in the path. See below for some sample path names:
| / |
"root" directory |
| /etc |
directory "etc" (sub-directory of the root directory) |
| /etc/default |
a file or subdirectory named "default" in the "/etc" directory |
| ~ | shorthand for the current user's HOME directory (usually "/home/<user_name>") |
| ~/something | a file or directory named "something" located in the user's HOME directory |
| . | A shortcut path specification which refers to the current working directory (see below) |
| .. | A shortcut path specification which refers to the parent of the current working directory |
Exercise 1
Create a path specifier for a
file named "my_file" in a directory named "my_dir" in a user's home
directory
Moving around the file system
At all times, the shell keeps track of the current working directory
that represents where you "are" in the filesystem directory tree.
This is useful because path names can be specified relative
to the working directory or as an absolute path. For example,
if your current working directory is your home directory (e.g.:
"/home/<user_name>") and within your home directory there
is a subdirectory named "some_dir", then you can specify the
path to this subdirectory as an absolute path
("/home/<user_name>/some_dir") or as a relative path
("some_dir"). Programs that you execute from the command line
may also be aware of the working directory and use it appropriately.
For example, if you run a program that generates a file the
typical default operation will be for the program to place the file in
your working directory unless directed otherwise. See below
for some additional examples.
| pwd |
Show the "present
working directory", or current directory. |
| cd |
Change current directory
to your HOME directory. |
| cd /etc/default |
Change current directory
to "/etc/default" |
| cd my_dir |
Change current directory
to "my_dir" which is a sub-directory of the current directory |
| cd .. |
Change current directory
to the parent directory of the current directory |
| cd $TEMP |
Change current directory
to the directory defined by the environment variable "TEMP". |
Exercise 2
Create a sequence of commands that do each of the following:
- Change to the "/etc"
directory and
verify that the change was successful using pwd
- Change to your home
directory and verify that the change was successful using pwd.
Listing directory contents
To list
the contents of a directory use the "ls" command:
| ls |
list the contents of the current working directory |
| ls -l |
list the contents of the current working directory in a long (detailed) format |
| ls -al |
list all of the contents of the current working directory, including "hidden" files (those that start with a '.'), in a long (detailed format) |
| ls <options> some_dir | list the contents of |
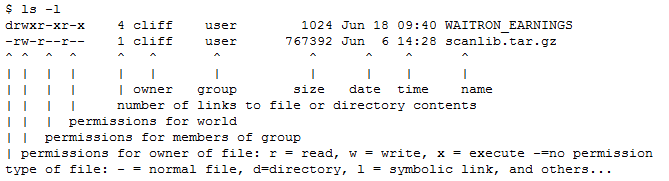
Here's
an annotated example of a listing command using the long format:
Exercise 3
Create a command that will output a long format listing of the current
user's home directory
Viewing and editing files
| cat filename |
Print the contents of the specified file to the screen (one or more files can be specified and each will be printed to the screen - one concatenated with the other |
| more filename | Print the contents of the specified file to the screen, but pause once the contents have filled the available screen real estate before printing more; when paused: ENTER = move one line down, SPACEBAR = page down, q = quit printing |
| less filename | Like more, but you can move forwards and backwards throughout the file using the arrow, page-up, and page-down keys (this utility is not available on all systems) |
| vi filename | Edit a file using the vi editor (all POSIX systems will have vi in some form, if using CYGWIN the "vim" package must be specified); working in vi is discussed below |
| emacs filename | Edit a file using the emacs editor (not all systems will have emacs) |
| head filename | Print the first few lines of a file |
| head -n filename | Print the first n lines of a file |
| tail filename | Print the last few lines of a file |
| tail -n filename | Print the last n lines of a file |
Exercise 4
Create the commands necessary to perform the following activities:
- Print the contents of the
file named "/etc/passwd" to the screen
- Print the last 2 lines of
the file named "/etc/passwd" to the screen
- Print the first 4 lines of
the file named "/etc/passwd" to the screen
Basics
of the vi
editor
Vi is a powerful text based editor with a steep learning curve - we'll
just cover the basics here that will allow you to open amd create
files, perform basic edit operations and save your work.
Opening a file
| vi filename |
Open the vi editor with the contents of file "filename" loaded. If a file named "filename" does not exist then a blank document will be presented in vi and will save to the file named "filename" by default. |
Creating
text
| i |
Enter edit mode with the cursor placed just before the current cursor position |
| I |
Enter edit mode with the cursor placed at the beginning of the current line |
| a | Enter edit mode with the cursor placed to append text just after the current cursor position |
| A | Enter edit mode with the cursor placed to append text at the end of the current line |
| r | Replace 1 character with the next character typed |
| R | Enter a special edit mode (overwrite mode) where each character typed replaces the next character starting at the current cursor position |
| <ESC> | Terminate insertion or overwrite mode |
Important Note: Some of the commands above will switch vi to "edit
mode" which
allows you to enter text in your document. When
you are done editing press the <ESC> key to
return to command mode.
Text commands
| x |
Delete a single character at the current cursor position |
| dd |
Delete the current line and put in buffer (analogous to a "cut" operation) |
| ndd | Delete n lines (n is a number) and put them in buffer (analogous to a "cut" operation) |
| yy | Yank current line into buffer (analogous to a "copy" operation) |
| nyy | Yank n lines into buffer (analogous to a "copy" operation) |
| p | Put the contents of the buffer after the current line (analogous to a "paste" operation) |
| P | Put the contents of the buffer before the current line (analogous to a "paste" operation) |
The buffer
is analogous to the clipboard in that it is used for temporary storage
of text which can later be recalled and placed in your document
Oops
| u |
Undo the last command executed (can repeatedly be issued to move "back in time" step-by-step |
| <CTRL> r |
Redo the last undone command |
Cursor positioning
| <CTRL> d |
Page down (the page-down key will work on most systems as well) |
|
<CTRL> u |
Page up (the page-up key will work on most systems as well) |
| h,j,k,l | Left, down, up, and right respectively (the arrow keys should work on most systems as well) |
| gg | Position cursor at beginning of file |
| nG | Position cursor at line n |
| G | Position cursor at end of file |
Saving and quitting and other
"ex" commands
These commanda re all prefixed by presing colon (":"), typing the
command and hitting enter. The command will typically be
displayed in the lower left corner of the window as you type.
They are called "ex" commands because they are command of
"ex" text editor - the precursor line editor to the screen editor vi.
You cannot enter an "ex" command when you are in an edit mode
(typing text onto the screen) - instead, similar to other commands,
press <ESC> to exit from an editing mode before issuing
these commands.
| :w |
Write the current file |
| :w new.file |
Write the file to the name "new.file" |
| :w! existing.file | Overwrite an existing file with the file currently being edited |
| :wq | Write the file and quit |
| :q | Quit |
| :q! | Quit (ignore any unsaved changes) |
| :e filename | Open the file 'filename' for editing |
| :set number | Turns on line numbering |
| :set nonumber | Turns off line numbering |
| :help | Bring up the built-in help system (may not exist on all systems) |
String substitution
| :n1,n2:s/string1/string2/ |
Replace the first instance of string1 with string2 on lines n1 to n2 |
:n1,n2:s/string1/string2/g |
Replace all instances of string1 with string2 on lines n1 to n2 |
| :1,$:s/dog/cat/g | Substitute 'cat' for 'dog', every instance for the entire file - lines 1 to $ (end of file) |
| :23,25:s/frog/bird | Substitute 'bird' for 'frog' on lines 23 through 25 (only the first instance on each line is substituted) |
Exercise 5
Use vi to perform the following activities:
- Create
a file named hello.txt containing the following contents
Hello, world!
Hook 'em
- Use string substitution to
replace the text "world" with "Austin"
Changing
file permissions and
attributes
As seen in the annotated
listing above, every file and
directory has an owner and a group associated with it as well
as three sets of permissions. Each set of permissions
specifies what the owner, group, and everyone respectively can do with
each item - be it reading, writing, or execution. When
examining whether a user is allowed to do something, the owner
permissions are used if the user owns the item, the group permissions
are used if the user is in the specified group, or the "world"
permissions are used for all other users. Some sample
commands that modify these permissions and attributes are given below.
| chmod 755 some_file |
Changes the permissions of "some_file" to be read/write/execute (rwx) for the owner, and read/execute (rx) for the group and the world (the specified numbers break down as follows: each number maps as a binary representation of the permission set for the owner, group, and everyone respectively; for instance in this example 755 maps to 7 => 111 (binary) => rwx => read/write/execute permissions for the owner, 5 => 101 (binary) => r-x => read/execute permissions for both the group and everyone else) |
| chgrp admins some_file | Makes "some_file" belong to the group "admins" |
| chown cliff some_file | Makes "cliff" the owner of "some_file" |
| chown -R cliff some_dir | Makes "cliff" the owner of "some_dir" and everything in its directory tree (all the files and subdirectories recursively in "some_dir")
|
You must be the owner of the file/directory (or have the all-powerful
capabilities of the system's "superuser") before you can do any of
these things.
Exercise 6
Create the command necessary to change the permissions on the
"hello.txt" file you created above so that
- its owner can read, write
and execute it
- it's group can read and
write it, and
- everyone else can neither
read, write, nor execute it.
Moving, renaming, and copying
files
| cp file1 file2 |
copy a file ("file1" is copied to a new file named "file2") |
| mv file1 newname | move or rename a file ("file1" is renamed to "newname") |
| mv file1 ~/AAA/ | move "file1" into sub-directory "AAA" in your home directory |
| rm file | remove or delete a file (one of more files may be specified) |
| rm -r dir1 | recursively remove a directory and its contents (one or more directories may be specified) - BE CAREFUL! |
| mkdir dir1 | create directories (one or more directories may be specified) |
| mkdir -p dirpath | create the directory path, including all implied directories necessary to create the specified directory path (e.g.: if "some/new_dir" is specified, the subdirectory "some" will be created, if necessary, before creating "new_dir"; one or more directory paths may be specified) |
| rmdir dir1 | remove an empty directory (one or more directories may be specified) |
Exercise 7
Create the commands necessary to
perform the following activities:
- Create a new directory named
"my_dir" in the current user's home directory
- Copy the file "hello.txt"
into the "my_dir" directory
Essential Bash Features
Interactive History
Bash keeps track of the recent commands you've issued. Each
time you press the up-arrow key, bash will place the next newest
command you issued on your command line for you. You can then
edit the command and re-execute it.
Command Completion
Another feature of bash is that you can use the TAB key to complete
something you've partially typed (e.g.: a command, filename,
environment variable, etc.). For example if you have a file
named "constantine-monks-and-willy-wonka.txt" in your directory and
want to edit it you can type "vi const", hit the TAB key, and the shell
will fill in the rest of the name for you, assuming the completion is
unique (i.e.: no other items in the directory begin with "const").
If the completion is not unique, you can hit TAB twice and
bash will print out all the possible completions that are available.
Environment
Variables
You can teach the shell to remember things for later using environment
variables. For example:
| MY_PROJECT=~/my_project |
Defines the variable "MY_PROJECT" with the value "~/my_project" |
| MY_CLASSES=$MY_PROJECT/bin | Defines the variable "MY_CLASSES" with the value of "MY_PROJECT" with "/bin" appended (this will be "~/my_project/bin" if "MY_PROJECT" is defined as above) |
| CLASSPATH=$MY_CLASSES:$CLASSPATH | Prepends the value of "MY_CLASSES" to the existing definition of "CLASSPATH" |
By prefixing a dollar sign, "$", to the variable name, you can
evaluate it in any command:
| cd $MY_PROJECT |
Changes your current working directory to the value of the "MY_PROJECT" variable |
| echo $MY_PROJECT | Prints out the value of "MY_PROJECT" (this will be "~/my_project" if "MY_PROJECT" is defined as above) |
Exercise 8
Create the commands necessary to perform the following actions:
- Set the variable "NAME" to
your first name
- Print a greeting yourself
(e.g.: "Hello, Evan!") using the "echo" command and the "NAME" variable
Pipes
The pipe symbol "|" (<shift>+backslash on most keyboards)
is used to direct the output of one command to the
input of another. This is an enormously powerful construct in
that you can chain utilities that each do a simple task together in
ways that allow you to accomplish much more complex tasks.
Here are some examples:
| ls -l /etc | more |
This command takes the output of the long format directory list command "ls -l /etc" and pipes it through the "more" command. In this case a very long list of files can be viewed a page at a time. |
|
du /etc | sort -n | tail -n 5 |
This command uses some tools we haven't introduced, but shows an example of chaining together simple commands. Here's how it breaks down: the command "du /etc" lists the sizes of all files and directories in the directory "/etc". The output from this command is then piped through "sort -n" which orders the output from smallest to largest size. Finally, that output is piped through "tail -n 5" which displays only the last 5 lines of its input (which will be the 5 largest items in the "/etc" directory). |
Note that most commands that will accept a filename as an argument can
be used as a receiver of pipe data (e.g.: "head -n1 some_file" and "cat
some_file | head -n1" will result in the same output, namely the first
line of "some_file").
Exercise 9
Create a pipe-based chain of commands that will print the names of the
first 5 files listed in the "/etc" directory.
Redirection
The redirection directives, ">" and ">>" can be
used on the output of most commands to direct their output to a file.
| head -n 10 some_file > new_file |
Redirects the output of the head command (detailed above) to a file "new_file" |
| head -n 10 some_file >> exist_file |
Redirects the output of the head command to the end of "exist_file" |
Exercise 10
Build upon the pipe-based command from above to create a command that
will write the names of the first 5 files listed in the "/etc"
directory to a file named "etc_files"
Command Substitution
You can use the output of one command as an input to another command in
another way called command substitution. Command substitution
is invoked by enclosing a command as follows: $(command).
Here are some examples of this in action:
| cat $(head -n1 some_file) |
This will read the first line from "some_file" and use it as the filename argument to the cat tool, which will print the contents. In other words, if "some_file" contains a list of filenames, this command will print the contents of the first file listed in "some_file". |
| A_FILE=$(head -n1 some_file) |
This shows an example of a common pattern of activity - namely, storing the results of a command in an environment variable. Similar to the previous example, the first line from "some_file" is read, but here it is stored in the environment variable "A_FILE". After this command is executed, you can refer to the first file name stored in "some_file" (e.g.: if you wanted to print the referenced file you could issue a "cat $A_FILE" command). |
Exercise 11
Create a command that will print the contents of the last file listed
in the "etc_files" file created in the previous exercise.
Essential Tools
Searching for files: The find
command
To find files within the filesystem use the "find" command.
This will search a given directory and all it's
subdirectories for items specified by the arguments specified. For
example:
| find search_path -name some_name |
This searches "search_path" for items named "some_name" |
| find . -name aaa.txt |
Finds all the files named aaa.txt in the current directory or any subdirectory tree |
| find / -name vimrc | Find all the files name 'vimrc' anywhere on the system |
| find /usr/bin -name "*svn*" | Find all files whose names contain the string "svn" which exist within the "/usr/bin" directory tree. Note the special syntax here for the specified search name: the asterisks ('*') in a search string will be matched to any string, including the empty string - this allows for the search to locate items with "svn" anywhere in the name |
Exercise 12
Create a command that will search all of the files in the current
user's home directory and report any filenames with the string "ll" in
them. Hint: This should report (at least) the filename
"hello.txt"
generated in the vi exercise above.
Searching
for strings in
files: The grep
command
To search within the contents of a file use the "grep" command.
For example:
| grep "find me" some_file |
prints all the lines in "some_file" that contain the string "find me" |
| ls /etc | grep a |
prints all the files or directories in the "/etc" directory that have the letter 'a' in their name |
Exercise 13
Create a command which will look in all of the files in the current
user's home directory and print any lines which contain the
string
"oo". Hint: this command should print (at least) the phrase
"Hook 'em"
from the file "hello.txt" created in the vi exercise above.
Reading and writing archives:
The tar
command
The tar command stands for "tape archive", which harkens back to a time
when the archives it creates were actually stored to magnetic tapes.
It provides a standard way to read and write archives
(collections of files and whole directory trees).
Often you will find
archives of stuff with names like "stuff.tar", or
"stuff.tar.gz". This is stuff in a star archive, and stuff in
a tar archive which has been compressed (using the gzip compression
program) respectively.
Chances are that if someone gives you a n archive written on a POSIX
system, it will be in tar format, and you will use the tar utility to
read it.
Likewise, if you wish to create an archive to give to someone else, you
should probably use tar as well. Here are some examples of
working with the tar utility:
| tar cvf archive.tar item1 [item2 ...] |
Create a tar archive named "archive.tar" containing item1, item2, etc. The list of items supplied should be one or more files or directories to be included in the archive (v = verbose: print statements that provide information about what actions are being performed) |
| tar tvf archive.tar | List the files in the archive named "archive.tar" without extracting them |
| tar xvf archive.tar |
Extract the files in "archive.tar" into the current working directory |
| tar cvzf archive.tar.gz some_dir | Create a gzip compressed tar archive containing everything in "some_dir" |
| tar tvzf archive.tar.gz | List the files in a gzip compressed tar archive |
| tar xvzf archive.tar.gz | Extract a gzip compressed tar archive into the current working directory |
Exercise 14
Create the command or sequence of commands necessary to perform each of
the following actions:
- Create a gzip compressed
archive named "my_archive.tar.gz"
containing everything in the "my_dir" directory created above
- Create a new directory named
"somewhere_new", move the
"my_archive.tar.gz" archive into the new directory, and extract the
contents of the archive in the new directory
Subversion from the command
line: svn
While a previous lab introduced working with subversion through a
graphical tool, subversion's root lie at the command line.
All subversion functionality is provided via the "svn"
command. See below for the basics:
| svn import some_dir repository_url | Add the directory named "some_dir" to a repository at the location specified by "repository_url" |
| svn checkout repository_url | Checkout items from the repository at the location specified by "repository_url" |
| svn update | Update the working copy from its repository |
| svn status | Show the status of the working copy |
| svn add some_item | Add "some_item" to the list of items tracked by the repository (requires subsequent commit to apply the action) |
| svn commit -m "My commit message" | Commits changes with a commit message of "My commit message" |
| svn ls repository_url | List the contents tracked in the repository location specified by "repository_url" |
| svn help <svn_command> |
Display svn's built-in help system (providing an svn command name is optional and will provide detailed help for the specified command) |
Exercise 15
Create a command that lists the contents of your directory in the class
subversion repository
Looking for help: The man
and apropos
commands
This tutorial merely scratches the surface of the available
tools and features provided by the bash shell. Fortunately,
almost everything you can do at the command line is well documented in
manuals available from within the command line interface.
When reading a manual page, navigation is the same as that
when using
the "less" tool described above (e.g.: arrow keys, page up/down move
around the manual, and 'q' will exit). These manuals can be
displayed using the "man" command, and the descriptions of each
manual page can be searched using the "apropos" command.
Examples of accessing the built-in manual pages and their
descriptions is shown below:
| man ls |
Shows the manual page for the "ls" command |
| man bash |
Shows the manual page for the "bash" shell (peruse this to get a sense for just how deep the bash feature set truly is) |
| apropos build | Shows a list of all the man pages whose descriptions contain the word "build" |
Exercise 16
Create the command necessary to display the manual page for the apropos
command
Putting it all together
Shell scripts are files that contain a list of commands that can be
executed by bash to perform a task. For instance here is a
very simple script for creating a snapshot of your home
directory:
#! /bin/bash
echo "Starting backup of home directory"
tar czvf /var/my-home-backup.tar.gz ~
echo "Backup complete"
Let's examine this script line by line:
| #! /bin/bash |
This should be the first line of all your shell scripts. It tells bash that the contents of the file are meant for execution and that they should be interpreted by the program at "/bin/bash" (which just so happens to be bash itself) |
| echo "Starting backup of home directory" |
This prints a status message about starting the backup process |
| tar czvf /var/my-home-backup.tar.gz ~ |
This script creates a compressed tar archive named "my-home-backup.tar.gz" which contains all of the files in
your home directory and stores it in the "/var" directory |
| echo "Backup complete" | This prints a status message about the backup being completed |
Note the first line of the shell script. This is one of two
things you need to do to make a shell script work and all shell scripts
should include this line. The second requirement is that the file
that contains the script be marked executable for the current user.
For instructions on marking a file as executable see the section on permissions
above. Using shell scripts you can create miniature (or for that
matter large-scale) programs to automate command line tasks.
Exercise 17
For our final exercise we'll put everything we've learned together and
create a shell script. The shell script you create will automate
the process of looking for a figurative needle in a haystack. The
haystack will be a large collection of files we'll provide. The
needle will be a file meeting a specific set of criteria. Let's
get to it!
Write a shell script that obtains the haystack from the class
subversion repository at this URL:
https://subversion.assembla.com/svn/ee461l-haystack/
The script then extracts all files from the archive named "haystack.tar.gz"
In all the extracted files, there are many files whose name contain "metal" and in these files there are many lines that contain word "needle".
Finally, the script finds a line that contains "needle". Also this line should be the last line of a file whose name contains the word "metal".
This line is "Congratulations, you found the needle!".
The final output of your script should be only one line that you have found, which is "Congratulations, you found the needle!"
Heavily inspired by
freeengineer.org's "Learn
UNIX in 10 minutes"
Developed with guidance from Miryung Kim
Copyright (c) 2011 Professor Miryung Kim and a course development TA Evan Grim
Portions copyright (c) 2000-2006 cliff <at> freeengineer
<dot> org
Permission is granted to copy, distribute and/or modify this document
under the terms of the GNU Free Documentation License, Version 1.1 or
any later version published by the Free Software Foundation; with no
Invariant Sections, no Front-Cover Texts, and no Back-Cover Texts.
A copy of the license can be found on the GNU web site here.